Showing posts with label free pattern. Show all posts

Sunday, July 17, 2016

About the Boys' Hats

Since I'd shared details about the girls' hats, I thought it only fair that I also share more about the boys' hats.  There were lots of options, but I decided on something related to Angry Birds (my older nephews really love Angry Birds).

I decided to use Red Bird with Attitude by Heidi Yates (free download at Ravelry) because the facial features looked great and didn't protrude from the hat (Also, I wanted my older nephews to wear their hats. Y'all know how older kids get about hand knits if they think it looks silly).
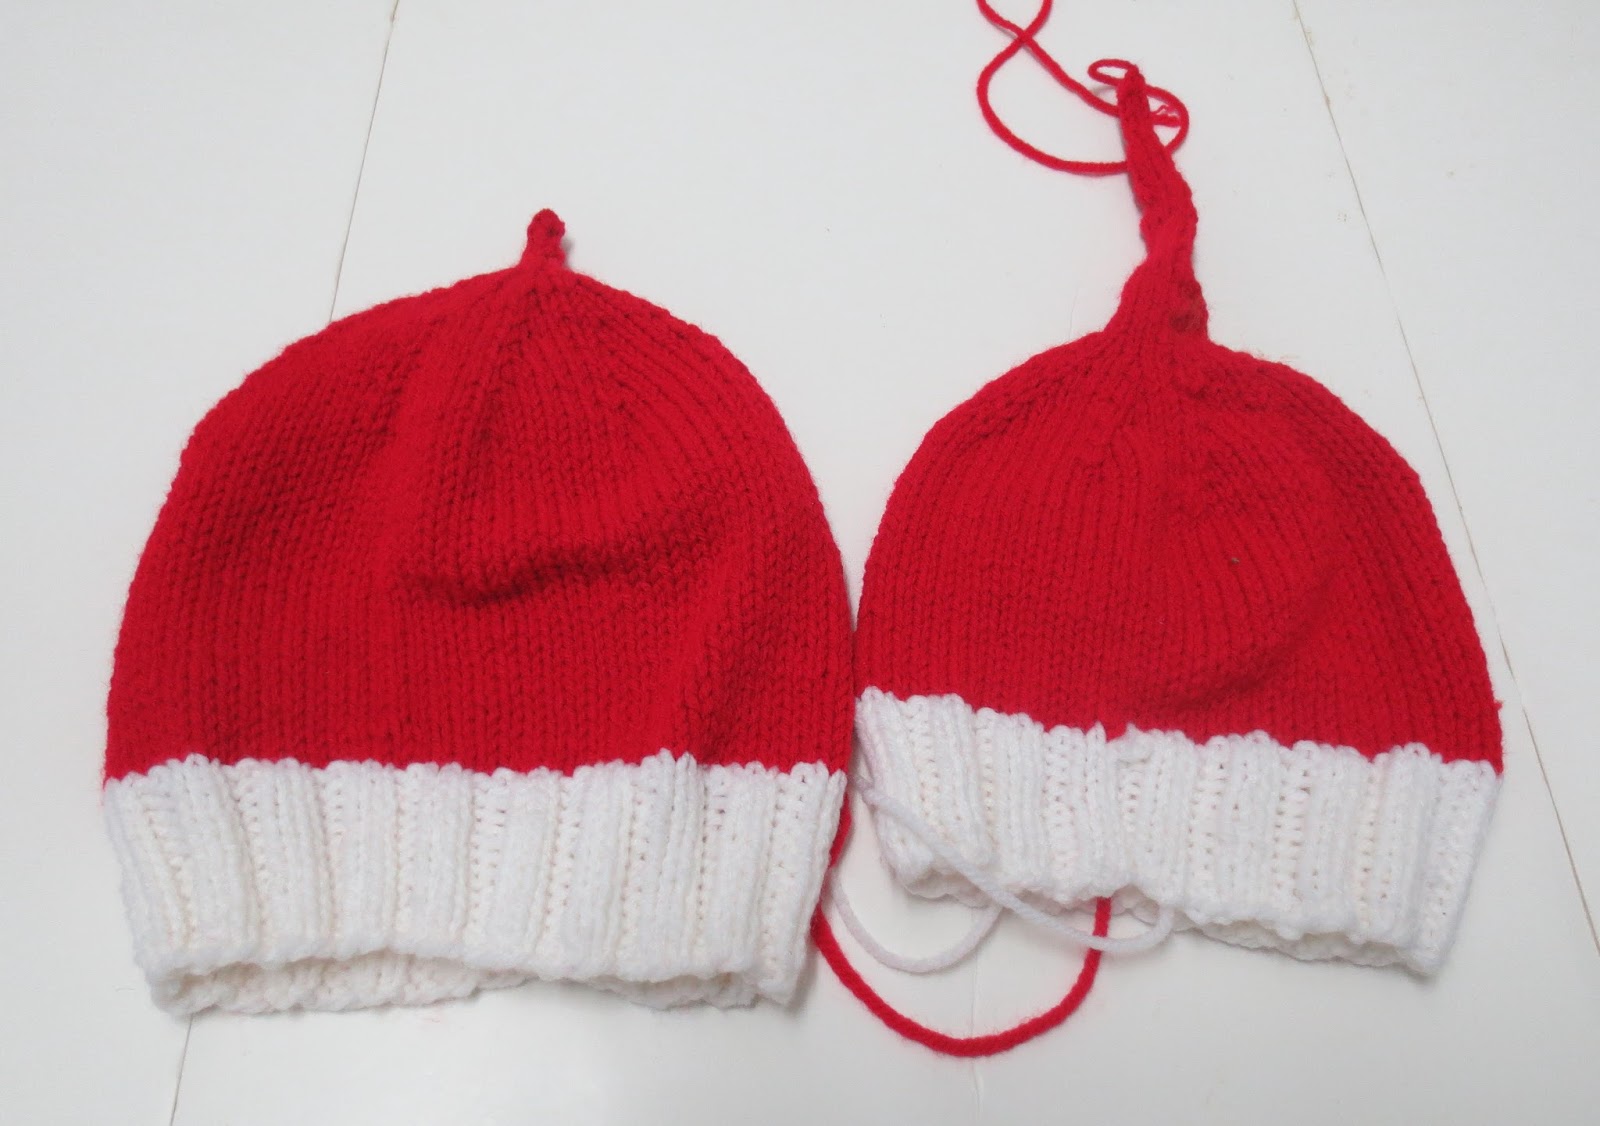
Finished hats before facial details are added
Here's the thing:  I needed to make some mods.  First off, the hat sizes tended to run on the small side.  I started with the child size, but that looked more like toddler size.  So I knit the next size up (teen size) to get something in a child size (sounds confusing, right?).  Also, I really didn't like the "tail" as written in the pattern.  I wasn't sure my older nephews would go for it.  What do you think (see version #1 pictured below)?
Hat version following pattern exactly as written

So for version #2, I made some mods:
1) Used 3.75mm circulars to work the brim for a more snug fit
2) Used K2P2 instead of K1P1.  That's just a personal preference.  Besides, I think my choice looks better.
3) Switched to 4.5mm circulars for body.
4) For decreases, worked them as written until row 16 where I made some minor changes in how the decreases are worked:
Row 16: K1 K2tog (18 sts for teen size)
Row 17-18: Knit
Row 19: K2tog (9 sts for teen size)
Row 20: Knit
Row 21:  K2tog till last st, K1 (5 sts teen size)
Row 22-24: Knit each round as I-cord
Row 25: K2tog K1 K2tog (3 sts teen size)
Rows 26-28: Knit each round as I-cord
Leave long tail and thread through last 3 stitches.  Fasten off.
Version #2 following modifications to "tail"
I think the modified version looks so much better than the first--so much better that I may rip out the first version and re-do.  Hey, I've got time. ;)

Saturday, April 2, 2016

MIA?

Missing mojo is sucky, but I gotta confess: even though I have been absent the last number of weeks, I got over my slump.  Yes Martha, there HAS been knitting!  And really, that's all that matters.
Pretty yarn
In fact, I finished one project and am very close to finishing another one.  And surprisingly, there are a few other small projects in the works--nothing new or special, but something that is needed (more on that later). 
In-progress beret
So the hat I was working on is one that's been in my queue for ages.  It's Wolly Wormhead's Meret (aka Mystery Beret).  It's a lovely pattern with clear instructions and tips for mods (you can find it here along with other free patterns ).  Everything about this project made me happy except for one thing: I lost a circular bamboo needle.  The cable separated from one of the needles.  Thank heavens I didn't lose any live stitches, but I was not happy.

With school just about done, I hope I can get back into regular weekly blogging.  More importantly, I wanna get back to regularly scheduled knitting--as in every night, if you please.  It's a great cure for itchy fingers. ;)

Sunday, February 1, 2015

Back to Knitting?

Pile o' Grannies
I have a lovely pile  o' squares waiting to be attached . . .  Alas, they must wait.  The problem is not enough time:  I need to put aside time to pin the grannies into place and then uninterrupted time to seam.  
Grannies
And even though I've got short snippets of time to make more grannies, my motivation is slowly slipping away . . . Seriously, I need a new project--something small and preferably something knit.  I'll admit it.  I miss knitting.
Briggs & Little, Bernat Super Saver and Bernat Roving
So I rummaged through my stash and found some plain, neutral yarns (don't the colours feel like a winter's day?).  For the longest time I have been itching to replace my Faux-Thrum Mittens from Dec 2010/Jan 2011--which honestly seems like eons ago!  One of the mittens was the first prototype, so it never quite looked right with it's wonky thumb.  The second mitt looks and fits better, but I wish I had made the thumb longer.  Besides, they have gone through the dryer so many times and look a little worn (the Bernat Roving has pilled a little).  On top of anything else, I was never terribly pleased with my colour selections.
Screen Capture of Other Mittens from Ravelry
By the way, when I was checking out my notes, I was quite surprised that other knitters had made my mittens too!  Wow!  That's really gratifying. :)

Wanna make some mittens too?  Check out the free mitten pattern here (or you could click the link called "Free Mitten Pattern" at the top of the website).  Hope you'll join me.   ;)


Saturday, June 29, 2013

About Those Dishcloths . . .

It may seem as if there's been very little crafting at casa d'Acrylic-Girl with all the gardening (did you read last week's post?).    But I have managed to find some crafting time--as little as it might be.  What little precious time I have has been spent working on more dishcloths of course!
Notice the ends?  Yeah, I have yet to weave in the multitude of ends **sigh** Guess its the trade-off for using lots of colour (besides, some of the colours I'm using are only small amounts). 
Besides the ballband dishcloths, I made a few more using my own pattern.  In the green-blue version pictured above, I added a navy border using intarsia.  In the white-blue version, I varied the pattern.  Instead of the typical slip and knit stitch, I used the eye of partridge stitch where the slip and knit stitches are alternated each row.

And then I saw some awesome dishcloths over at Purl Soho blog.  All three patterns utilize  slipped stitches to create a thick yet colourful fabric.  While all three patterns look interesting, only the third pattern actually caught my eye.  The Triple L Tweed Dishcoth has a lovely texture created with three colours.
Since the original patterns called for a DK weight, I had to modify the stitch count for my worsted cotton.  Instead of the original 76 called for, I cast on 36 stitches and followed the pattern as written.  My attempt didn't quite look like the version pictured.
What do you think?  Doesn't it look different?  I worked a few rows of multi-coloured garter and then adjusted the pattern using 33 stitches plus 2 (one for each end as selvage since my plan was to pick up stitches and work a few rows of garter).  This means I eliminated the first 3-stitch section of the pattern (I'll post my mods when I'm finished).
I'm not sure the changes worked . . . I'll keep you posted. ;)

Later . . . 

Sunday, June 2, 2013

Presenting . . .

Another dishcloth--of my own design, no less! ;)
Inspired by the thickness and durability of slip-stitched heels, I created a garter trimmed design to use up odds and ends of cotton.  I wasn't sure if the design would work, but in the end it created a nice pattern and a thick fabric--handy for a dishcloth or washcloth. 
The purl bumps on the back are handy for scrubbing. 

I made some mods after working the original, but here's the pattern:

STRIPEY SLIP-STITCH DISHCLOTH
Cast on 39 stitches using colour A.
Work 6 rows garter stitch. 
Row 7: K2, PM, knit to last 2 stitches, PM, K2
Row 8: K2, purl to marker, K2
Row 9: Using B  K3, *S1, K1  Continue from * until last 2 stitches. K2
Row 10: K2, purl to marker, K2
Row 11: Switch to colour A and repeat row 9
Row 12: Repeat row 10
Repeat rows 9-10 to complete pattern, alternating colours A and B until desired length is reached.
Work 6 rows garter stitch and bind off.  Weave in ends.

Hoping to make a few more and perhaps add a few mods.  Please share yours if you decide to make one. ;)

Sunday, November 18, 2012

And Now for Some Knitting (and Crochet) . . .

Looking back on my posts for the last couple weeks, I realized there hasn't been much knitting content--in fact, no mention of crafts!  For shame!  'Cuz there has been knitting--much knitting!  
Meet Shroomy
First, meet my lovely new assistant, Shroomy.  She's a bit of a noob, so her sister Toadette is showing her "the ropes", so to speak.  I know Shroomy is missing her spots and her braids, but the wee one is finished as far as I'm concerned (maybe over the holidays, Santa could drop off a few spots and braids--maybe).
Two Sisters
And a new friend patiently awaits his tentacles.  I've got two done and am working on a third.  Since I'm working in the round, it's been a bit of a pain trying to remember how to avoid that dreaded colour jog . . . 
An octopus with his tentacles
The process works the same for either method: work one round with the new colour.  With the one on the left (below), I slipped the first stitch and then worked the round as usual.  With the right one, I picked up the stitch below and worked that with the first stitch.  Which one looks better?
Which looks better?
I prefer the one on the right 'cuz it doesn't leave any loose stitches (not visible from photo).  I just have to be careful how I pick up the stitch below so that it doesn't get twisted.  In the end it won't matter too much 'cuz the "seam" will be facing inward.

I also finished one big project (psst, its the Garter Surprise), but I think I'll wait before posting FO photos here (although you are more than welcome to check it out at my Ravelry project page [Rav link]).
Ball Band Dishcloth
I even managed to cast-on and finish another project: the ball band dishcloth(free pattern link at Ravelry).  That pattern has been sitting in my queue since forever!  I've been meaning to try it out and finally succumbed (mainly 'cuz while searching through the stash, I came across lots of leftover Bernat Handicrafter Cotton).
Lovely Dishcloth
The pattern is easy enough to follow.  I used the finished dishcloth this morning and it didn't stretch out too much when wet.  Of course I used the wrong size needles, so to compensate I cast on six less stitches than called for in the pattern.  Me thinks I'll make more . . . ;)

Saturday, January 21, 2012

About the Slipper Mods

Through the Woods
A few knitters have contacted me through Ravelry re: row-by-row instructions for the child version of the non-felted slippers.  So I decided to publish my changes here on the blog so I can re-direct other knitters here.  You will still need to print off the original pattern.


Child Version of Non-Felted Slippers
Here are my changes: Cast on 40 sts 
Row 1-K20 PM K20 
Row 2-Increase as per original pattern (44sts) 
Row 3 (and all odd rows)-Knit 
Row 4-Increase (48 sts) 
Row 6-Increase (52 sts) 
Row 8-Increase (56 sts) 
Row 10-Increase (60 sts) 

Row 11-Knit and remove markers

Instep: Row 1-Knit 
Row 2-P27 PM P6 PM P27 
Row 3-K20 ssk twice K3tog K6 sl 1 K2tog psso K2tog twice K20 (52 sts) 
Row 4-Purl 
Row 5-K16 ssk twice K3tog K6 sl 1 Ktog psso K2og twice K16 (44 sts) 
Row 6-Purl 
Row 7-K25 ssk (43 sts) 
Row 8-sl 1 P6 P2tog (42 sts) 
Row 9-sl 1 K6 ssk (41 sts) 
Row 10-sl 1 P6 P2tog (40 sts) 

Row 11-sl 1 K6 ssk (39 sts) 
Row 12-sl 1 P6 P2tog (38 sts) 
Row 13-sl 1 K6 ssk (37 sts) 
Row 14-sl 1 P6 P2tog (36 sts) 
Row 15-sl 1 K6 ssk (35 sts) 
Row 16-sl 1 P6 P2tog (34 sts) 
Row 17-sl 1 K6 ssk (33 sts) 
Row 18-sl 1 P6 P2tog (32 sts) 
Row 19-sl 1 K6 ssk DO NOT TURN K11 (31 sts) 
Row 20-P18 P2tog P11 (30 sts) 
Work cuff as written in original pattern.

Please remember this is NOT my pattern.  This great slipper pattern comes from Yuko Nakamura who has kindly provided her work for free here on Ravelry (it's a PDF file you can open and store on your computer or save in your Rav library).


Hope this helps out anyone who wants to make a child-sized version. I'll be back with a proper post soon.
Winter's Bounty

Saturday, January 7, 2012

Sometimes . . .

Big Slipper and Little Slipper
When I get the urge, I'll start a small project.  The thing might languish in my basket for a while.  But sometimes, the thing gets finished before I know it.  Go figure?!
New Slippers for my Son
Remember those lovely warm slippers I made before the holidays?  Well I tweaked the numbers in the pattern and made a pair for my son.  His old pair were wearing a wee bit thin in the sole (there was a small hole forming too, no doubt made by a loose nail in the old wood floors).

You can find the pattern for Non-felted Slippers on Ravelry (its a PDF file).  The version there is for an adult woman.  If you're interested in the child size, print off the original pattern and then make the following changes:

Cast on 40 sts and work the increases as indicated in original pattern with the marker placed in the middle.  Stop increases at row 11 (60 sts) and then work instep at follows:
Row 2: P27 PM P6 PM P27
Follow the original pattern to work the decreases and shaping.  I went down to 30 sts before working the cuff. I also added two extra rounds to the cuff before binding off.

Feel free to PM on Ravelry if you'd like more extensive row-by-row notes.

Happy knitting! :)

Monday, December 12, 2011

Faux-Thrum Mittens Revisited

Beginnings of Mitten
And revised.  Its been almost a year since I last looked at my Faux-Thrum mitten pattern.  And with the weather getting colder, I'd been itching to make a pair for my son.  With only one size in the original pattern, I've had to re-work the sizing.  More important, I'm re-checking my instructions.  After all, if I can't figure out my own directions, I can't expect some one else to understand, right?
Weaving in Ends on First Mitt
So as of yesterday afternoon, my mitten pattern has been revised and corrected (sadly I found a couple of typos, but at least I re-checked the numbers).  Hopefully there are no more errors.


Happy knitting :)

Sunday, December 4, 2011

About Those Slippers . . . .

Finished Slippers
So here they are--all finished!  They look comfy, don't they?  'Cuz they sure do feel comfy and cozy.  I just love 'em so much!  Best slippers ever! :D
Comfy and Cozy

Saturday, December 3, 2011

Pure Genius!

Slipper Before Being Seamed
No word of a lie!  This slipper pattern is absolutely sublime :D  Its the Non-Felted Slipper (and the pattern is only available on Ravelry as a PDF file).  I just love the construction!  Hard to believe that a few well placed decreases can change the shape of the fabric--just genius!
Slipper From Another View
And since the pattern uses bulky yarn, it works very quickly.  It took me a week of sporadic knitting, but these could easily have been completed in a weekend.  This quick knit would make an easy Christmas present.  I can testify to their warmth factor (I'm wearing them right now, but you'll have to wait for FO pics on another day 'cuz its dark out now).


Later,
:)

Tuesday, January 4, 2011

Goals and Plans: What? Me? A Designer?

Over the past few months, I've had a few ideas percolating in my brain.  I never thought about design (after all, I'm not looking to re-invent the wheel).  But a few things have intrigued me and spurred on a design possibility.

First, wool intrigues me.  Not so much wool itself; rather wool's insulating properties, particularly in the application of mittens.  Imagine getting your mitts wet and still being able to stay warm?  How cool is that!  As a teacher,  I know only too well the consequences of wet mitts and frigid temperatures.

Another interest has been the thrum mitten.  The idea of fluffy warmth surrounding one's hands on a blustery February morn is quite appealing.  However, thrum mitts do look rather bulky and I wasn't sure if I was up to the challenge of constructing such an article (although a few of the gals at knit night have made them).

Stash to the rescue!  In my bin, I found 100% wool in my Briggs and Little along with extra skeins of bulky, soft Bernat Roving.  What if I combined the two to create a cushion-like fabric without all the bulk of a thrum?  With needles in hand I cast-on, taking copious notes, ripping out as needed and re-knitting.  Where did it all lead?

Introducing my lovely Faux-Thrum Mittens (link to free pattern page on this blog). 
It doesn't look like a thrum mitten; however, the diagonal pattern creates a layer of roving floats inside to cushion and thicken the fabric.  Now Bernat Roving is only 20% wool, but Briggs and Little makes 100% wool roving and Patons Roving is 100% wool (both of which are available locally so I may have to experiment).
Inside the Mitten
Writing a pattern is a little intimidating--and even a little daunting--but its done.  Please check it out.  Hopefully I can churn out another pair of mittens and maybe coax a friend to test knit it.
Related Posts with Thumbnails