Showing posts with label modified. Show all posts

Sunday, March 18, 2012

Wingin' It

Literally I winged it.  I made it up as I went along. Remember my cute amigurumi of cthulhu from last week?  Well I managed to finish his wings, but I improvised my way through it.


So here's the scoop:
Step 1-gather your supplies: yarn, hook and 6" pipe cleaner.  I recommend using one that is the same colour as your yarn (I used yellow 'cuz it was all I had on hand--it was that or brown).
Supplies
Step 2-make a slip knot and then work many sc around the pipe cleaner.  I got about 20 sc (you may get more or less).  Then bend your pipe cleaner about a quarter of the way along.  Make sure your stitches face inward. Also, make a small bend at each end to keep your stitches from falling off the pipe cleaner.
Working sc around pipe cleaner
Step 3-Slip stitch to the 6th sc (I actually cut my yarn and joined again at 6th sc).  Work a sc in the next 3 sc.  (3 stitches).  Turn your work.
Attaching work to sc along pipe cleaner
Step 4-increase 1 sc in first stitch, then work a sc in each sc.  Before turning work, work a sc from the pipe cleaner (6 stitches)
Step 5-now comes the improvisation.  Continue working each row, increasing and attaching your work to the sc along the pipe cleaner.  Now depending how the fabric is looking, you may need to increase an extra stitch, stop increasing or perhaps even decrease.  The goal is to create a somewhat smooth fabric between the bent pipe cleaner sides--one that resembles a triangle.
Incorporating sc on pipe cleaner as the wingspan increases
Step 6-once you've worked across and created a triangle, you can work the points of the wings. I used groups of 5-6 stitches and made an inverted triangle.  I worked decreases on every other row.  Once one point was completed, I slip stitched down the triangle and worked another point using another 5-6 stitches. 
Finished wing
It's not perfect but it works and resembles the designer's original creation.  Hope this helps anyone else attempting the pattern.

Saturday, January 7, 2012

Sometimes . . .

Big Slipper and Little Slipper
When I get the urge, I'll start a small project.  The thing might languish in my basket for a while.  But sometimes, the thing gets finished before I know it.  Go figure?!
New Slippers for my Son
Remember those lovely warm slippers I made before the holidays?  Well I tweaked the numbers in the pattern and made a pair for my son.  His old pair were wearing a wee bit thin in the sole (there was a small hole forming too, no doubt made by a loose nail in the old wood floors).

You can find the pattern for Non-felted Slippers on Ravelry (its a PDF file).  The version there is for an adult woman.  If you're interested in the child size, print off the original pattern and then make the following changes:

Cast on 40 sts and work the increases as indicated in original pattern with the marker placed in the middle.  Stop increases at row 11 (60 sts) and then work instep at follows:
Row 2: P27 PM P6 PM P27
Follow the original pattern to work the decreases and shaping.  I went down to 30 sts before working the cuff. I also added two extra rounds to the cuff before binding off.

Feel free to PM on Ravelry if you'd like more extensive row-by-row notes.

Happy knitting! :)

Friday, July 15, 2011

Take a Guess

Which project did I choose?  The Bountiful Bohus of course.  'Cuz I really do need a warm-all-purpose-goes-with-everything cardi for the fall and winter.  I've got some ratty looking cardigans that need to go into the trash (don't worry; they're store-bought ones from 10 years ago so they've more than served their purpose).  And anything I made over the past 2 years is probably too big as I've recently lost weight (you'd think 20 lbs wouldn't be a big deal--and normally it would not be a problem--but in fact, those 20 lbs disappeared over the last 6 months.  In total I've lost closer to 35 lbs over the course of 2 years so that now I seriously need to go clothes shopping, especially since attempts at shrinking my clothes in the dryer haven't been too succesful).

Beginning of First Sleeve

I decided to start off with the sleeves 'cuz if the sizing isn't working out, I can easily rip it out without too much guilt.  Already I've made mods: instead of casting on 100 stitches as called for in the pattern, I'm using 80 stitches.  Thus far, the measurements have worked to my favour--at least according to the pattern schematics.
Detail of Cables on Sleeve Edging
Since my swatch told me I've got 5.5 stitches per inch (instead of the required 5 st/in), I'm gonna aim to use the medium size to give myself a sweater that should turn out to be large.  What?  There's no medium?  The smallest size is large?  Yeah, I'm gonna have to extrapolate the numbers on that one.  But that requires--ack!--math!  No worries.  According to the pattern, each subsequent increase in size went by 20 stitch increments.  So I'm hoping that a decrease in 20 stitches will give me the required size.  The key word here is HOPE.

Wish me luck--please wish me luck 'cuz I'm gonna seriously need it.  :S

Sunday, May 3, 2009

Clearing Away Winter


After my low-key birthday celebrations, hubby and I decided to clean away all the winter debris from our deck. The shining sun and warmth spurred us on: I moved garbage cans, broken toys, a broken table and a dried up Christmas wreath while hubby cleaned off his barbecue (see the pic above? Wish I had taken a "before" shot, but the photographic evidence of my messy and disorganized ways would have been too shameful--and I couldn't have that).

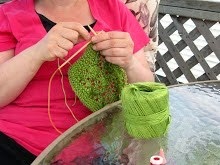
See the sweater I'm modeling. Remember the frogging of last week (or was it 2 weeks ago)? My Short-Sleeved Cardi with Ribbing no longer has ribbing (and of course it was never short-sleeved). I re-worked the bottom portion in plain stockinette to the length specified in the schematic (approx 23-24 inches). When I compared it to another cardigan in my closet, the length seemed just right. The sleeves were a dilemma: I struggled over whether to keep the ribbing or frog those too. After a few try-on's, I decided to leave the sleeves. All in all, it's not bad. At this point, I just want to finish this project because (a) it's been on the needles a long time and (b) I really wanna wear it before summer finally arrives. Only the button bands need to be worked. I'm hoping to start those this evening after a nice BBQ supper--the first one is always the tastiest!

So, what has this entire experience taught me? A lot.
  • Consider negative ease (it can be your friend)

  • Compare your WIP to the schematic measurements

  • Its okay to frog (I learned that from the Yarn Harlot)

  • No one will arrest you if you re-work the pattern to suit your needs (its called "modifications")

  • Remember that I'm still a fat girl and some design elements don't always work well on the pleasantly plump

  • And I'm not as fat as I think I am

Related Posts with Thumbnails