Sunday, August 18, 2013
Road Trip!
The best thing about road trips?
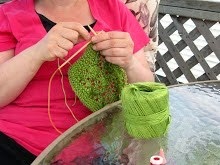
 In-car knitting, of course! The best knitting is accomplished in a moving car (as long as you're not knitting and driving at the same time, ha ha). I've cast-on for my pinky-pink bombshell and it's movin' along nicely. So far, so good. ;)


Saturday, August 10, 2013
What Time Is It?
 |
| Adventure Time Opening Sequence |
 |
| Princess Bubblegum |
 |
| Not a Hat! Beginnings of a Wig |
 |
| Pink Stash |
 |
| A Really Big Ball of Pink |
Till next time . . . .
Monday, August 5, 2013
Jurassic Pig and Other Farm Tales
 |
| Sneaking up on pigs whilst they rest in their shelter |
 |
| Fleeing pigs . . . |
 |
| Turkeys |
 |
| Older egg-layer strutting 'bout the big pen |
 |
| New egg-layer deciding if it's safe to venture out . . . |
 |
| Meat birds in movable pens |
 |
| Potatoes, peppers and celery |
 |
| Corn, tomatoes, broccoli, carrots and beets |
;)
Saturday, July 27, 2013
More Stash?
 |
| Squinting in front of Baadeck Yarns |
 |
| Waterfront View of Baddeck |
 |
| Pretty Nordlys from Viking of Norway |
Friday, July 26, 2013
Made More . . . .
 |
| Stripey Towel with Solid Potholder |
 |
| More Bright and Cheery Kitchen Towels |
Wednesday, July 24, 2013
Kitchen Towel
Yup I've been crafting, but not knitting. Sewing. Made a few kitchen towels with potholder toppers. Very easy and--most important--absorbent. I've seen kits to make knitted or crocheted kitchen toppers, but the thin towels get drenched quickly. Also, with the hard water from our well, light coloured fabrics get stained. My goal was to create an absorbent kitchen item in dark colours.
I made kitchen towels using matching potholders and hand towels (ones for the bathroom) purchased at dollar stores and large chains (bought mine at Walmart and 5 to a Dollar).
 Step 1: Fold towel in thirds, ensuring that the folded width matches the width of the pot holder. Pin into place. With "wrong side" facing (that is, with the folds visible), sew across the middle, width-wise. This will ensure that the towel will never unfold.
Step 2: Flip over the towel to right side. Place potholder in middle of towel, with"wrong side" of potholder showing. Pin potholder to middle of towel. Sew down the middle of potholder, width-wise.
Step 3: Fold potholder so that towel hangs from it. Attach button to potholder so that loop acts as buttonhole.
Step 4: Hang finished towel from any convenient handle (preferably near a sink)
 Sadly this great craft idea is not mine. My MIL found something similar in a flea market in Florida. So many thanks to the clever anonymous crafter who came up with the original idea. I just improved upon it. ;)
 |
| Kit from Mary Maxim |

 |
| Checking folded width of towel with potholder |
 |
| Sewing folds of towel down middle, width-wise |
 |
| Sewing potholder to folded towel down middle, width-wise |
 |
| When attached potholder folded in half, towel "hangs" |
 |
| Button sewn into place |

Sunday, July 21, 2013
Finishing . . . And other Stuff
Even though I was back to work, the past week was still good. I finally had a chance to meet up with the gals at knit night--and that's always quite enjoyable.
And there was knitting, of course. I actually finished a sock and immediately cast on for the second one--only a few more inches till I turn the heel. Isn't the self-striping pattern cool? I sooooo need more woolen socks 'cuz summer won't last forever (although hard to even contemplate winter at this point).
By the way, I finished the modified dishcloth from PurlSoho. Not quite sure it looks like the original Tweed Slip Stitch, but I still like the finished pattern. I also love the thick fabric created by the slipped stitches. I'd love to make more with different colours, but as usual, there are other projects needing my attention . . . .
By the way, here are my mods for the pattern. I used Bernat Handicrafter Cotton which is worsted, so the original stitch counts had to be adjusted. I cast on 35 stitches (33 for stitch pattern plus 1 stockingnette stitch at each end = 35 stitches total). Then I worked a few rows of garter stitch before working pattern as follows:
Row 1: Purl
Row 2: K1, *Sl 1 (wyib), K2. Repeat from * till last stitch, K1
Row 3: P1, *Sl 1 (wyif), K2. Repeat from * till last stitch, P1
Row 4: K1, *K2, Sl 1 (wyib). Repeat from * till last stitch, K1
Row 5: P1, K1, *Sl 1 (wyif), K2. Repeat from * till last stitch, P1
Row 6: K1, K1, *Sl 1(wyib), K2. Repeat from * till last stitch, K1
Row 7: P1, K2, *Sl 1 (wyif), K2. Repeat from * till last stitch, P1
Work the same number of garter rows before binding off. To finish off, I picked up stitches along the side (approximately 30 stitches) and worked same number of garter rows to create a border.
 |
| More Woolen Socks |
 |
| Sock Detail |
 |
| Tweed Slip Stitch Dishcloth |
Row 1: Purl
Row 2: K1, *Sl 1 (wyib), K2. Repeat from * till last stitch, K1
Row 3: P1, *Sl 1 (wyif), K2. Repeat from * till last stitch, P1
Row 4: K1, *K2, Sl 1 (wyib). Repeat from * till last stitch, K1
Row 5: P1, K1, *Sl 1 (wyif), K2. Repeat from * till last stitch, P1
Row 6: K1, K1, *Sl 1(wyib), K2. Repeat from * till last stitch, K1
Row 7: P1, K2, *Sl 1 (wyif), K2. Repeat from * till last stitch, P1
Work the same number of garter rows before binding off. To finish off, I picked up stitches along the side (approximately 30 stitches) and worked same number of garter rows to create a border.
Subscribe to:
Posts (Atom)